Torque measurement is usually compared by a torque meter with a higher level of accuracy, or measuring by a lever (adding measuring weight method). For the accuracy measurement of the larger torque sensor of 150 kNm, the above two methods are not easy to achieve due to the limitation of the force source conditions. Some time ago, we used the indirect measurement method for the 150 kNm hydraulic power tong torque test bench to complete the detection work, and calibrated the display system of the large torque sensor detection system.
Meters and tools are as follow:
- Tension load cell meter: measuring range is 100kN, accuracy is 0.1%FS, and the relative error given in the certificate is positive deviation, +0.05%, linear.
- Self-made equal-arm lever, 1050mm*2, tolerance ±1mm. The actual measured value is 1050.2mm.
- Universal angle ruler, 0°~320°, accuracy 0.2°.
- Manual hoist (power source), 10tfx2.
- Steel base plate and vector force column (fixed point: manual hoist reaction force point).
Operation steps:
- Insert one-end of the torque sensor on the steel base plate with higher strength.
- The middle of equal-arm lever is connected on the upper end of the torque sensor.
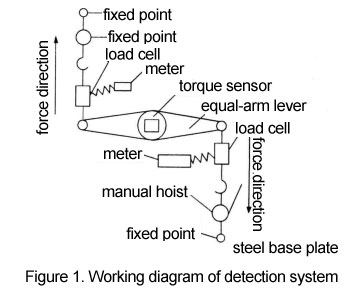
- 100kN tension load cell and manual hoist are connected together and fixed on the vector force column of the base plate (two sets).
- Adjust the column so that the tension load cell is parallel to the lever.
- Drive the manual hoist to gradually add force at both ends of the lever to determine the torque.
Working diagram (Figure 1)

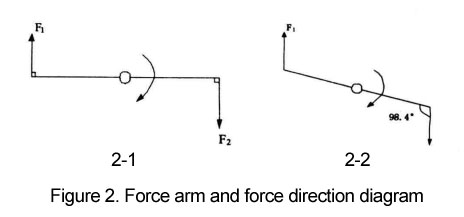
Ideal working condition, the force arm forms an angle of 90 with the force direction (Fig. 2-1).
In the actual working state, due to the gap, the angle between the force arm and the force direction is greater than 90° (Figure 2-2). This included angle was measured with a angle gauge, and the result was 98.4°.

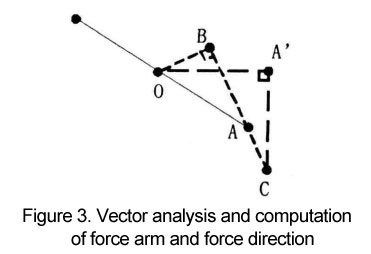
Vector analysis and calculation: (Figure 3)

OB-lever projection arm (mm);
T-the torque value of torque measurement point (kN m);
F - tension force value (kN)
F=T/OB
OCA=98.4°
OA=1050. 2mm
OB=OAsin ( 180°- 98.4°) = 1050.2 *sin81.6°=1050.2*0.989272 =1038. 934mm=1. 038934m
Since 2 manual hoists are used to increase the tension force, the resultant force is T, and the tension force on each side is T/ 2. Corresponding to the point of 20 kNm, 40 kNm, 80 kNm, 120 kNm and 150 kNm:
F20=20/OB=20/ 1.038934=19.2505kN
F40=40/OB=40/ 1.038934=38.5010kN
F80=80/OB=80/ 1.038934=77.0020kN
F120=120/OB=120/ 1.038934=115.5030kN
F150=150/OB=150/ 1.038934=144.3788kN
The above is the resultant force of two tension load cells, each load cell bears half of the force, and try to keep the force balance during the afterburning process. When the force value is gradually increased to 144 kN, the angle deflection of the torque sensor is 0.6°, which is small and can be ignored. The relative error of the tension sensor system is +0.05%, which can also be ignored. After the set force value is stabilized, input it to the microcomputer control part of the hydraulic power tong torque test bench, and save the ID value after confirming it. After repeated testing, it fully meets the requirements of Class 1 accuracy of the "hydraulic power tong torque test bench".
This article has introduce one calibration method of our practices during lagre torque testing for your reference.